Showing posts with label chocolate. Show all posts

Monday, July 18, 2011

No Campfire Required


Smore's are the quintessential summer dessert. Images of campfires and flaming marshmallows come to mind... and then that yummy flavor of crispy and sweet graham crackers with gooey warm chocolate and crunchy/fluffy marshmallows... it's pretty delicious. So, when my mom emailed me this recipe, I got quite excited: Smore's... no campfire required!

Individual Smore's Cups and Bars

1 pouch (1 lb 1.5 oz) Betty Crocker® sugar cookie mix
1 cup graham cracker crumbs

1 cup butter or margarine, melted

16 snack size Hershey bars

4 1/2 cups miniature marshmallows

Heat oven to 375°F. In large bowl, stir together cookie mix and crumbs. Stir in melted butter until soft dough forms. Place cupcake liners in muffin tin. Press the dough into the bottom of each slot (should be 1/8 or ¼ inch thick). Take the rest of the dough and press into the bottom of an ungreased 8x8” pan.

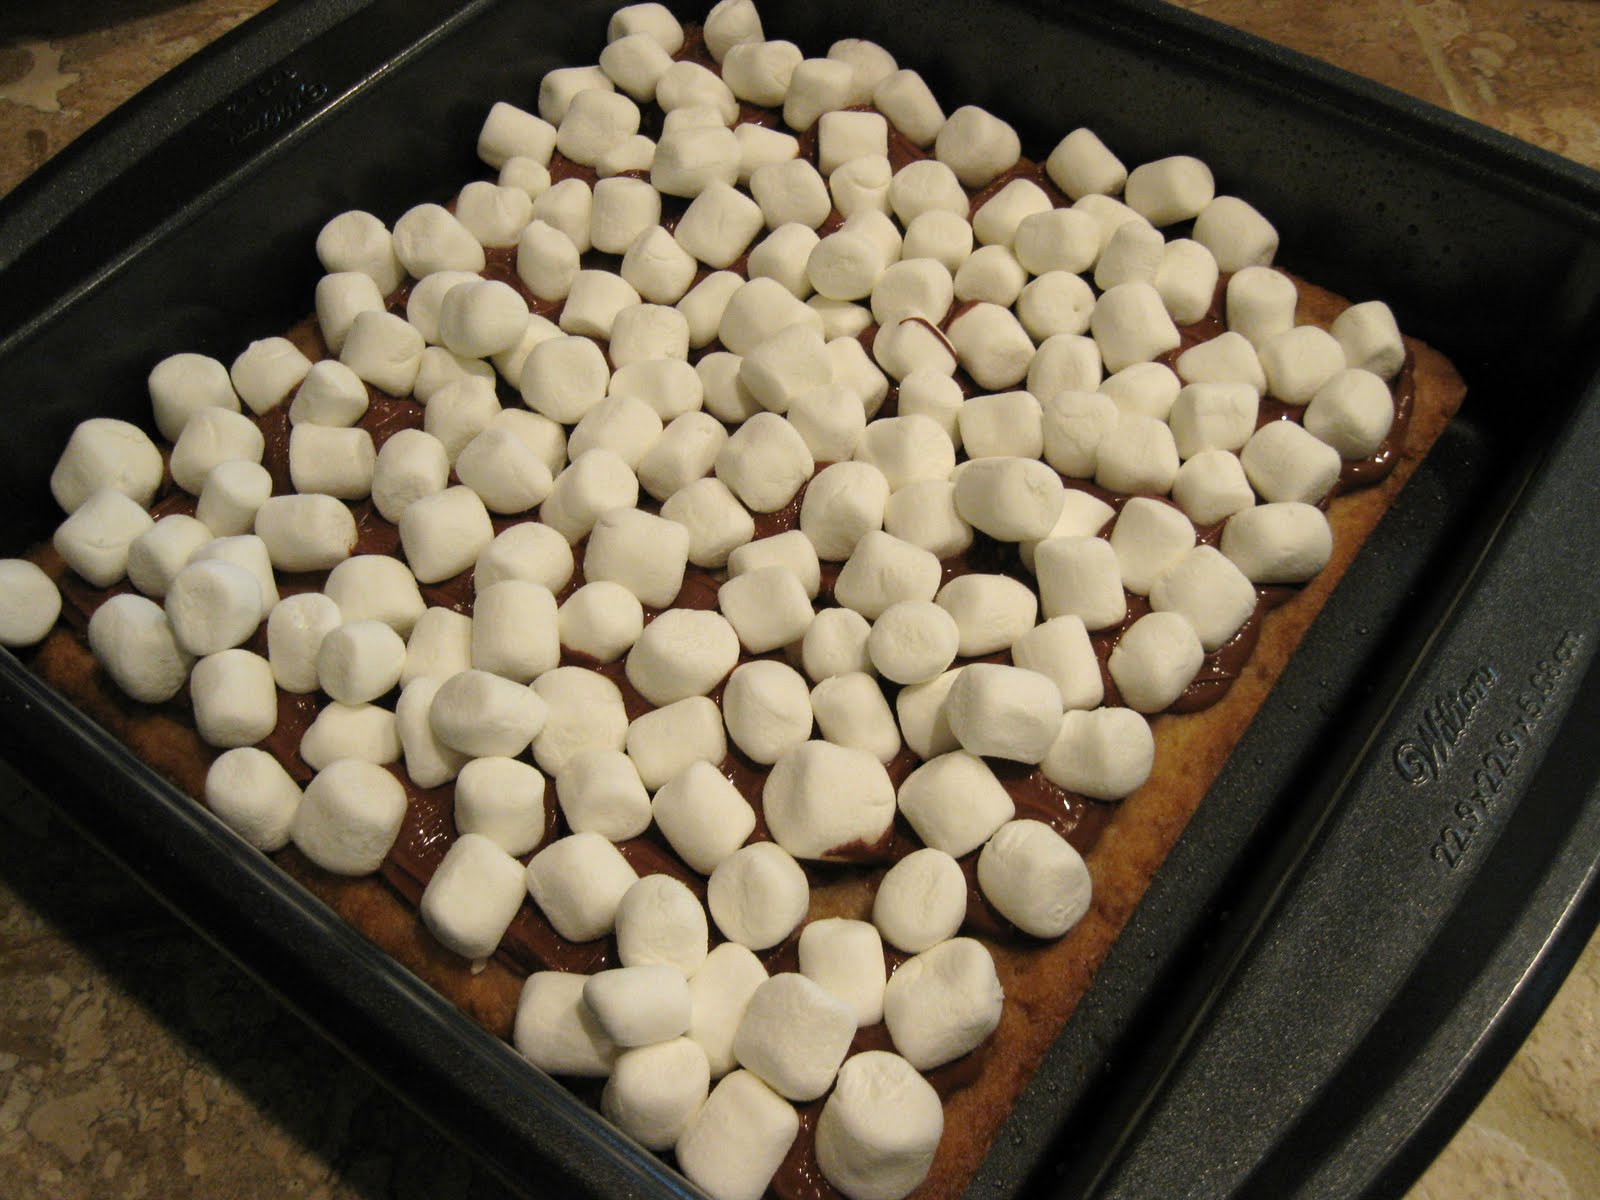
Bake muffin tin for 10-15 minutes and the 8x8” pan 18-20 minutes or until set. Break the hershey’s bars in half and immediately put one in each of the cupcake liners. Once the 8x8” pan is out of the oven, do the same. Let stand 3 to 5 minutes or until chocolate begins to melt. (You can stick them back in the oven for 1-2 minutes if it isn’t melting)

Set oven control to broil. Sprinkle marshmallows over melted chocolate. Broil with top 4 to 5 inches from heat 20 to 30 seconds or until marshmallows are toasted. (Watch closely; marshmallows will brown quickly.) Cool 10 minutes. For bars, cut into 6 rows by 4 rows. Serve warm. Store any remaining bars/cups tightly covered.

Mise en Place

You can take out your frustration on the
graham crackers by pounding them
into oblivion...

After you add the butter to the dry mixture

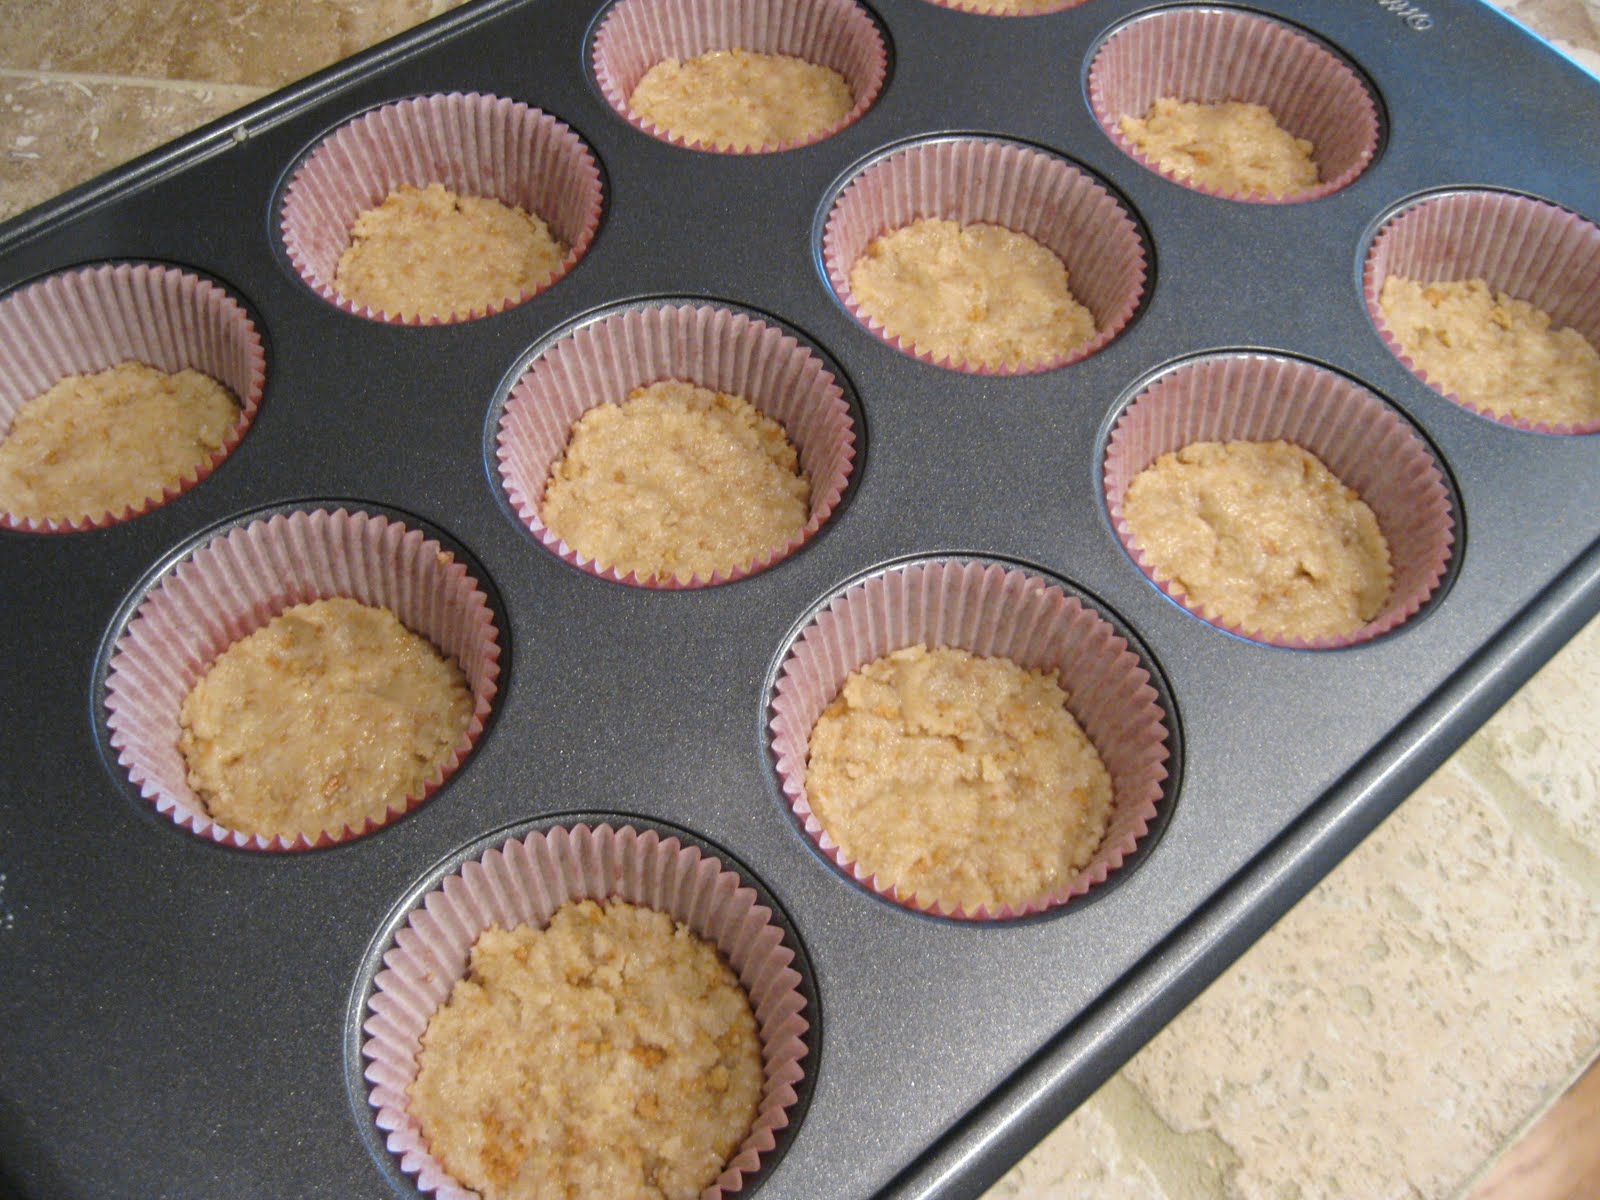
Press the dough into the bottom of the cupcake liners

Press the dough into the baking pan

All baked!

Add the chocolate...

Nice and melty!

Do the same with the large pan
Add the marshmallows!


Ta-dah! :)
So, there you have it! The most yummy of smore's... and you don't have to be outside in the woods to eat them! Now, as a VERY IMPORTANT side note, do NOT stop watching them when they're under the broiler. I repeat: DO NOT take your eyes off of them. Why? This, my friends, is why:

Is it the surface of the moon? Nope. It's a lovely lava field of flame-broiled mini marshmallows. Don't do this. You'll be sad. Remember: only YOU can prevent marshmallow fires. :)
 
~ Mari

Tuesday, March 29, 2011

Homemade Granola Bars

Granola bars are great. Quick, tasty, and very portable. You know what's not great about granola bars? They aren't the best things for you. Even if you get the 90 calorie kind (Ryan's personal favorite), they still have things like caramel color, corn syrup solids, and all kinds of other lovely things I can't pronounce. In other words, they are processed. Plus, they only have about 1 gram of fiber each! So, I decided to take a crack at making a healthier, more protein-filled granola bar that isn't too hard on the wallet either. I've made a few different versions, but I like this one best. Keep in mind you can substitute things to your liking. If you don't like almonds, use walnuts. If you don't like chocolate chips (you're an alien), use carob chips or dried fruit. Get the idea? Good.

Chocolate Chip Granola Bars

1 cup organic rolled oats, toasted
1 cup crispy rice (that's Rice Krispies to you)
3/4 cup wheat germ (you can find this at health food stores and Publix)
1/2 cup toasted & chopped pecans
1/2 cup toasted & chopped almonds
1/2 cup chocolate chips
1 cup nonfat dry milk
1/3 cup whole wheat flour
1/4 cup crunchy peanut butter
1/4 cup real maple syrup (you know how I feel about Mrs. Butterworth...)
1/2 cup no sugar added applesauce
3 eggs
1 egg white

Preheat oven to 350 degrees F. Combine all dry ingredients in a large bowl. Stir to combine. Heat peanut butter and maple syrup (in a microwave safe bowl) in the microwave for 30 seconds. Stir to combine. Add peanut butter mixture to dry ingredients. Beat eggs and egg white in bowl and add. Next, add applesauce. Stir to combine. Mixture should be moist, but not runny. Spray a 9x13" pan with cooking spray. Place a piece of parchment paper in the pan so that two sides (the 13 inch sides) of the parchment stick out over the sides. This will make is super simple to pick up the granola bars out of the pan and cut them. Now, bake them for 20-25 minutes (until set and lightly browned). Take them out and let them cool. Then lift them out of the pan using your parchment paper handles and place on a cutting board. Cut into rectangles and wrap individually with cling wrap. Refrigerate half and freeze half. Or don't. Whatever you want!


Hope you like them! :)

~ Mari

Monday, May 31, 2010

Happy Memorial Day!


Hope everyone had a fabulous Memorial Day! It is raining here in Kathleen, but we had our Memorial Day festivities last night, so all is well. Above is crudite and crackers with roasted red pepper hummus. A great way to start off the evening!


Our meal consisted of large hunks of prime rib (oh yeah....), steamed broccoli, and roasted fingerling potatoes. Twas delicious!

And then there was dessert... I made individual trifles (brownies, chocolate fudge pudding, snickers bars, and cool whip) that were ridiculously easy!

So, happy times to everyone!
~ Mari

Saturday, May 8, 2010

Splendid Ice Cream, Indeed


It arrived! Our ice cream from Jeni's Ice Cream (in Ohio) arrived in the mail yesterday. And first, can I just say how ridiculously satisfying it is to receive ice cream...on your front doorstep? Amazing.


We opened the box and... there they are! Four pints of delicious-ness (but, we didn't know that yet)! We ordered Queen City Cayenne, Meyer Lemon Yogurt, Dark Chocolate, and Goat Cheese with Roasted Red Cherries. OH my goodness.

First, we tried the Dark Chocolate. It was like eating a creamy frozen brownie... bittersweet with a dry mouthfeel afterward. Hands down THE best chocolate ice cream I've ever eaten.

Then we tried the Queen City Cayenne. When you first put it in your mouth, it tastes like a ligh chocolate cinnamon ice cream with rich undertones... and then you feel it: the back of your mouth and your throat are on fire with sweet cayenne! Genius!


Then We tried the Meyer Lemon Yogurt. You know how really ripe Meyer lemons smell? Well, that's how this ice cream tastes. It is creamy, yet light, and has the perfect amount of sour lemon flavor. I want to eat some again just talking about it!

And how about that splendid flavor combination above? I could barely contain myself over this one. GOAT CHEESE... in ice cream? Holy guacamole, it was delicious! You could taste the goat cheese, but it wasn't overpowering. It was like cheesecake, but with goat milk. Then - there were huge, succulent roasted sour cherries... it was almost too much to take.

In summation, if you want to get someone an AMAZING gift (namely, me. just kidding. not really.), I would send some Jeni's Ice Cream her/his way. I still can't choose my favorite. Each one I taste at that moment is my favorite... in that moment. I can't wait for lunch...so I can eat dessert!
~ Mari

Sunday, April 4, 2010

Baskets, Grass, and Chocolate


Happy Easter, everyone! I hope that it is as beautiful wherever you are as it is here in East TN! The sun is shining, the grass is green, and all is well!

Happy egg hunting!

~ Mari


Monday, June 29, 2009

A Little How-to-Do

Since I found this fascinating, I thought I would share it!

How to cover the sides of a cake with a chocolate ribbon:

Step 1: Temper chocolate.
Just heat some melting chocolate (nothing with paraffin) in a double boiler until it is melty and liquidy.


Step 2: Spread the chocolate on measured plastic
Measure a piece of shiny, thick plastic (a heavy duty garbage bag would work well) to be the height, width, and circumference of the cake. Make sure that it is a little longer than you want it so you can overlap it a little bit. Then spread a thin and even layer of chocolate on the plastic with a spatula.

Step 3: Put the chocolate ribbon on the cake
Place the chocolate ribbon, chocolate side in, on the cake and press lightly so that the melted chocolate will attach, somewhat, to the sides of the cake.


Step 4: Peel it off
Let it sit for a minute or two and peel the plastic backing off of the chocolate. Try to overlap a little where the seam is. You can take a hot spatula and fix that area later.


Step 5: Ta dah!
And there you have it... a shiny, smooth, and easy way to make any cake more beautiful and, best of all, more chocolate-y!
- Mari


Monday, November 10, 2008

Double Chocolate Chip

When Chef Hallman told us we could make any cookies (from the list) that we wanted... we went for the double chocolate chip ones. I mean... who wouldn't? They were DELICIOUS. Just so everyone knows.

We also made three peach pies (with double crusts - meaning there is a crust on the bottom and one on the top) in our group. We didn't get to try them, but ours looked amazing... as opposed to the other groups' pies that looked...well...sad. Haha. A trick that we learned is this:

- If you brush your pie crust with egg wash, it will brown & bubble

- If you brush your pie crust with heavy cream, it will look rich and shiny

We went with rich and shiny for something different. And, as I said before, it went over quite well. I hope that whoever gets to eat those pies appreciates them! (Granted, it could be me... tomorrow... in culinary cafe)

We also made Parker House dinner rolls - which were sorta fun, but not nearly as fun as making 2 lbs. of chocolate cookie dough. ;)

No pictures today - but, I'll try to take some on Wednesday. It will be our first production class. We will actually be serving real live people food that we made. Eeek! And... I'll be "chef of the day." Great. Haha. I'm sure I'll have some stories... and hopefully some photos to add to the blog as well.

Monday, October 20, 2008

"I Would Buy One!"


Our assignment (after making literally tons of gingerbread sheets) was to make cookies... any cookies from a formula in our text book. My group (Megan, Jeff, and I) had trouble choosing between peanut butter and chocolate chip cookies. So, we made both.

They were quite easy to make... and were delicious. One woman in our class took a bite and said, "Oh... I would definitely buy these cookies." I thought that was a good compliment.
Did I mention they were HUGE? We use ice cream scoops to scoop out the batter onto the sheet pans... and I think we got the big scoops today. Either that or we were making them the size of our hunger. Never make cookies on an empty stomach.

So, it was an enjoyable day in the bakery. Good cookies, good times.